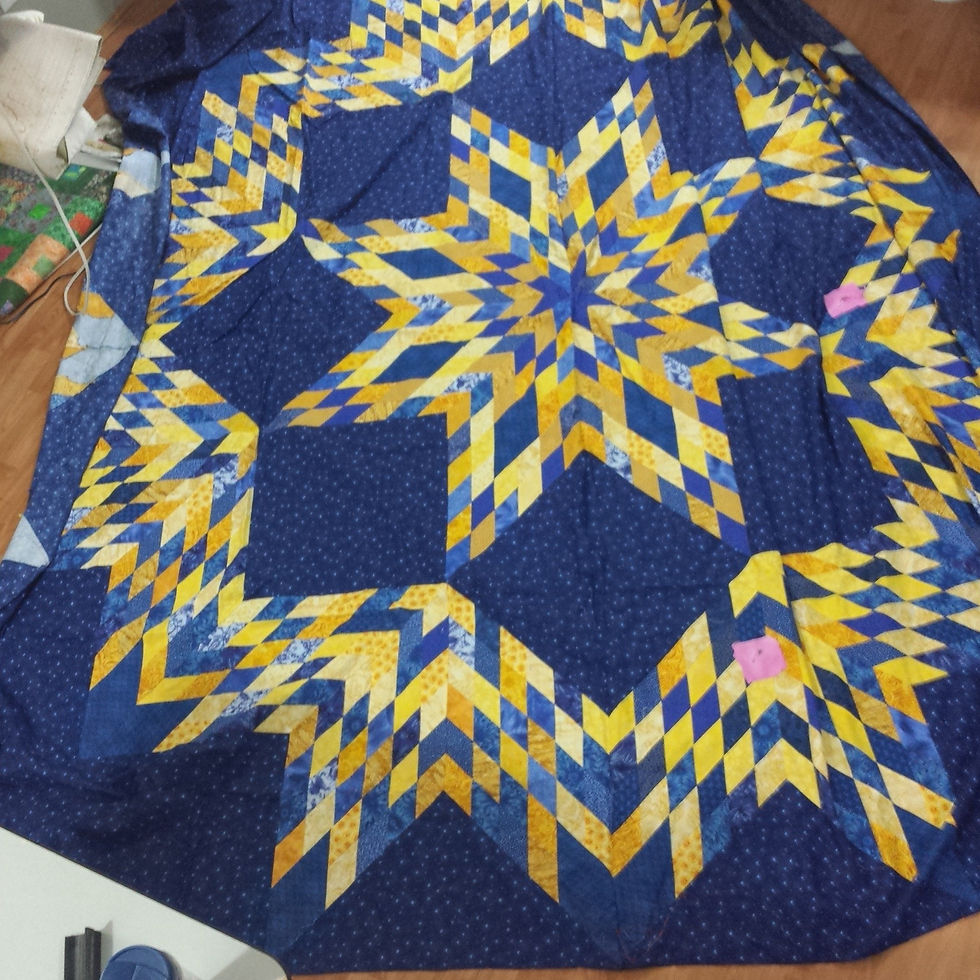
Challenge 2017/18 - # 31, Alberta Lone Star
- Allison Spence
- Feb 27, 2018
- 3 min read

This fantastic quilt was started so very long ago that I've forgotten when I started it. Probably like the Asian Stack-n-Whack I posted about, it was the late 1990s or early 2000s. I love Lone Star quilts. I think I like them so much because they require precise stitching and give lots of space for free motion quilting.

I had this ready to go and was showing it off to friends when I noticed that there were a few mistakes. See the pink squares pinned on? Either I had put a blue where a yellow diamond should be or a yellow where a blue diamond should be! Finally got it fixed and it was added to my challenge quilts to get done!

I did finish it in 2017, but haven't posted about it till now.

I loaded the quilt on my frame and basted through all layers. I knew I'd be doing a lot of rolling back and forth and knew it was safer to do this extra step to prevent shifting. I'm so glad I basted because this quilt came off the frame at least 2 times before I finished quilting it. I started with continuous curves to quilt all the diamonds. I had bigger plans, but decided the simplest was the best way to go.

This quilt has a double batt of cotton and a wool on top to add texture without too much weight. mmmm, I should consider weighing this sucker as it is 112" x 112" and quite heavy to carry.
When I got to the background areas, I knew I wanted to quilt a feather wreath and marked my centre with diagonal chalk lines and found two rulers to draw my inside circle and my spine circle. I didn't worry too much how big the feathers got on the outside.

I found the bare feathers a bit boring so added echo quilting outside the feathers and curls inside each feather. I like that much more. the WonderFil Specialty Thread Mirage #32, Before Dark was the perfect choice. WonderFil variegated threads are random dyed and the color changes are never the same length. I love the effect thy give in any quilting.

There was a lot of space in the outside corners, so I chalked in a curved line and attempted to create a continuous curved border all around the outside edge of the quilt.

Once all my quilting was done with my variegated thread, I needed to fill in the background. I needed to give my head a shake with this idea!!!! 1/2" grid lines!!!! Yep, I did them all. I started with pounce powder and a plastic template but wasn't having much luck with the lines, so I ended up drawing every stinking line and then quilting continuous curves!! I am pleased to say that I got pretty good at this by the end of the 112". A swipe with a hot iron removed all the lines. For the crosshatch stitching, I used WonderFil's DecoBob #301, Navy.

I always like to see the texture on the back of quilts and intentionally chose to use a tone on tone fabric to show off the quilting. I used WonderFil's DecoBob #301 in the bobbin.

The final step of any quilt is to bind it. I couldn't find any of the background fabric in my stash and didn't want to introduce another navy and have it clash, so I resorted to my favourite trick. I used a faux piped binding with a nice bright yellow and a solid navy fabric. The quilt and binding fabrics look like they match fairly well when they are separated by the yellow strip. Here are the best instructions I have found and it's a PDF that you can easily print.
What can I say? The quilt is finished and it is probably one of the biggest I have ever attempted. I have another Lone Star in pieces and need to carefully plan the quilt so that it won't be too big. The other option is getting a king size bed!


